Showing posts with label Acoustic guitar. Show all posts

Fishman Rare Earth | Installation & Demo

I just installed my Christmas present and it’s awesome! If you’re looking for some amazing acoustic guitar tone, the Fishman Rare Earth Blend has it for sure. So, today, we’re diving into the Fishman Rare Earth Mic Blend—an impressive soundhole pickup designed to elevate your acoustic guitar's sound. Whether you're a performing artist or a home studio enthusiast, this piece of gear promises to deliver a rich, natural tone.

Installation is a breeze. Just loosen the cork-lined mounting clamps, position the pickup near the end of the fingerboard, and tighten gently. For temporary use, you can run the cable out through the soundhole. For long-term use, Fishman recommends professional installation of the endpin jack. In this video, I show you how easy it is to install it yourself as well.

The Fishman Rare Earth Mic Blend is a game-changer for acoustic players. Its blend of mic and pickup technology provides unmatched tonal versatility. Whether you're performing live or recording, this pickup brings out the best in your instrument. 


Song Arrangement

Song arrangement, in its purest form is making things exciting, engaging, and emotional. Music in
itself demands, at times, an emotional response. While there are several tools we can utilize to add this much needed element to our art, arrangement is the most effective ingredient of a song to keep it
interesting.

Our mix can only go so far with our mixing skills and mixing ninja tricks. Though plug ins, mic
placement, effects ITB and outboard, etc. can provide a great foundation for emotional real estate,
arrangement is the icing on the cake. A great song can be hindered or helped by this one element.

There are at least 8 identifiable arrangement strategies that are used in music. I will explain briefly what each strategy consists of and try to give some examples of how they're
used. They are as follows:

• Minimal
• Reproducible
• Maximal
• Steady-state
• Cumulative/Subtractive
• Stepped
• Dynamic Contrast
• Unplugged/Plugged


Minimal

A minimal arrangement is one in which there are very few instruments and/or they are played in a
minimal style without to much complexity. This arrangement strategy makes good use of silence and
uses the vocals to feed emotion.

Reproducible

This arrangement strategy is one that is recorded with a live sound in a studio or is actually recorded
live. It is one that can be reproduced in a live setting without losing its studio versions fingerprint.

Maximal

This is the proverbial “Wall of Sound”. Anything goes in creating this wall as well. All instruments in, 40 vocal parts, you get the point.

Steady-State

This is where the song is pretty toned down. It may have a loop that plays through the whole song, a
sound effect or something, but it generally stays in the box. This style focuses on the lyrics more.

Cumulative/Subtractive

This arrangement style allows the song to grow and expand as it progresses, and at times may take
away elements to create interest and emotion. It usually ends in a climactic moment.

Stepped

A stepped arrangement is one is which the song uses two or three identifiable sections that are
contrasted by their dynamic level and instrumentation. The song alternates between these, stepping up to one and down to another at times. It also has varying keys and tempos at times.

Dynamic Contrast

The intention of this arrangement strategy is to create ear shock, usually by a sudden loud snare hit or
instrument. This can be achieved as well by volume changes and intensity.

Unplugged/Plugged

Some times a song that is done acoustically will be redone in an electrical fashion and vice versa. There used to be a trend for awhile that almost every artist had to do an unplugged version of some of their songs. It can fill another slot on that album and let new listeners hear something old, as well as old listeners hear something different. This can be really cool if you're predominantly a rocker, and then you put an acoustic song on your album. Keep them guessing and they'll stay interested.

Check out the video below for an example of nearly all of these elements in one song.


A Faster Fretboard

As a guitarist there is nothing more amazing than picking up a guitar that has been well maintained, set up properly, and has a fast fret-board. If you haven't heard the terminology "Fast Fret-board"... I made it up. No, just kidding, someone else did.

Basically, it is a term that means a fret-board that isn't impeded by dirt or grime, it has smooth frets that are free of nicks and dings, and due to it's set up allows one to play well without other things getting in the way. (Or slowing you down)

In this video I give a quick tip on how to speed up your fret-board and some basic maintenance of the same. I hope you enjoy! Oh, and if you decide you'd like the Dunlop 6500 System 65 Guitar Maintenance Kit that I mention in this video (HIGHLY RECOMMENDED) Then use the link I just provided to help a brother out at no extra cost to you. It's like Amazon leaving me a little change in the tip jar for sending some business their way. God Bless!


A Guitar's Best Friend: Humidity


Have you ever wondered why your guitar plays great one day, yet feels completely different on another? Suddenly the fret edges are sharp or the action has shifted and the guitar won’t play in tune anymore. These changes can happen overnight, especially in the winter. Cold, dry weather brings low humidity and that causes cracked guitars. Winter is my busiest time of year for structural repairs, and most of these repairs are preventable with an inexpensive humidifier. I’ve been preaching this message for more than two decades: Preventive measures are the key to keeping your guitar in top condition.

Dealing with humidity.
Humidity is the amount of moisture or water vapor in the air. The more moisture in the air, the higher the humidity. Lesser amounts of moisture results in lower humidity.
There’s a popular myth that a guitar sounds better when it dries out. Actually, it just cracks and then I get to charge a fortune to repair it. This myth is often confused with a guitar’s natural aging process. When a guitar ages, cells in its wood begin to crystallize and harden, causing the guitar to get louder and more dynamic. But if it’s not properly humidified, the wood will crack. (Did I mention structural repairs are very expensive?)
But you can have too much of a good thing: When a guitar is over humidified, it swells up and loses volume and tone. (Think of a tub of lard with strings.) High humidity can also cause finish discoloration and even allow mold to grow inside the guitar.
The way to avoid these problems is to maintain a consistent humidity level for your instrument—particularly an acoustic hollowbody. This will prevent a host of ailments and costly repairs.

Symptoms of low humidity.
One of the common telltale signs of a dry guitar is sharp fret ends. When a guitar dries out, the fretboard shrinks and the frets protrude beyond the wood. Correcting this problem requires re-humidification, conditioning, and fret filing. If your guitar is showing signs of low humidity (sharp fret ends, cracks, or separated glue joints), you need to have it evaluated by a reputable luthier.
This is what happens to a dry guitar in various levels of low humidity.

LEFT: Fig. 1. This top cracked from lack of humidity. MIDDLE: Fig. 2. Fretboards can also crack as a result of low humidity. RIGHT: Fig. 3. The Humidipak guitar humidifier system. Photo courtesy of Planet Waves
Below 35 percent humidity:
• Action (string height) changes.
• The top flattens out.
• Fret ends feel a little sharp.
Below 25 percent humidity:
• Fret ends become very sharp.
• There are drastic changes in the playability.
• Seams begin to separate.
• There’s a slight separation between the bridge and top.
• The finish starts to sink.
Below 15 percent humidity:
• Cracks appear in the top and body (Fig. 1).
• The bridge and fretboard crack (Fig. 2).
• The glue joints in the neck, bridge, and braces begin to separate.
All of these ailments will greatly lower the value of the instrument—not to mention your enjoyment of playing it—so be sure to maintain your guitar at the proper humidity level.
What is the best humidity level for my guitar?
Most experts say 40-50 percent. At this level, a guitar will sound and play its best. A great way to control humidity is to use a humidifier. Think of it as an inexpensive insurance policy to protect you from very expensive repairs.
A guitar humidifier is easy to use and very effective. Some guitar humidifiers are suspended between the 3rd and 4th strings and contain a damp sponge that needs remoistened every two or three days. This type of product works okay, but it’s not consistent. The humidity will spike at first, then slowly diminish as the sponge dries out.
The more modern guitar humidifiers use a gel that not only emits humidity, but also absorbs it if the humidity gets too high. This technology was first developed for cigar humidors, and now it’s available for guitars. Planet Waves makes a great humidity control system called the Humidipak that uses this technology. I’d also recommend using a hygrometer to measure the humidity.

LEFT: Fig. 4. A room humidifier in action. MIDDLE: Fig. 5. Thanks to heat exposure, this bridge separated from the top leaving a gap big enough to slide in a seam separation knife blade. RIGHT: Fig. 6. Use a wood conditioner to protect your rosewood or ebony fretboard.
Another great way to control humidity is to use a room humidifier. This is a great idea if you have multiple guitars in one room. Humidifiers come in all shapes and sizes, but be very selective, as some work much better than others. I use a programmable humidifier that utilizes both “warm mist” and “ultrasonic technology.” It also has a built-in hygrometer and a UV light to help purify the water. This type of humidifier is much healthier than the “cool mist” types that require a filter.
What guitars need to be humidified?
All guitars should be humidified, even electric solidbodies. Newer guitars generally need more moisture because the wood is kiln-dried, as opposed to a vintage guitar made from air-dried wood. The difference between kiln and air-dried wood is dramatic. Kiln-dried wood uses heat to dry the wood to accelerate the aging process. However, these guitars require more moisture to prevent warping and cracking. Air-dried wood is more stable, especially in vintage guitars, because the wood was generally aged over a decade before being made into a guitar. As a result, the cracked wood was removed from the pile and used for something else. Guitars made from air-dried wood still need humidity to sound best, but they retain moisture better than their modern counterparts.

Too hot to handle!
Heat exposure can also have destructive effects on a guitar. When a guitar is left in the trunk of a car—especially on a sunny day—the glue joints can fail. Imagine the shock of opening your case and finding a pile of wood where your guitar used to be. Once again, I get to charge a fortune for repairing heat-damaged guitars, so be vigilant.

A frigid nightmare.
Cold is also an enemy. When a guitar is exposed to low temperatures and then brought into a warm environment, the finish can develop checking. Checking creates tiny hairline cracks in the finish—like someone laid a spider web over the finish— and you can’t polish this out. Finish checking is permanent and can only be repaired by refinishing (not something I would recommend). Finish checking is basically the result of the finish changing from one temperature extreme to the other. This causes the finish to expand and contract too fast, and that makes it crack. To minimize this, when you bring your guitar in from the cold, don’t open the case until the outside of the case is at room temperature. Even then, there’s no guarantee the finish won’t check, but it will lessen the odds.
Okay, let’s review—here’s how to prevent damage to your beloved guitar:
• Buy a guitar humidifier.
• Keep your guitar at between 40–50 percent humidity.
• Use a hygrometer.
• Keep your guitar in a consistent environment (one that’s comfortable for you).
• Keep it out of direct sunlight and out of the car trunk.
These simple steps can save you hundreds of dollars in repairs.

Adapted from: http://www.premierguitar.com/articles/Fighting_the_Humidity_Battle

John Levan Nashville guitar tech, has written five guitar repair books, all published by Mel Bay. His bestseller, Guitar Care, Setup & Maintenance, is a detailed guide with a forward by Bob Taylor. LeVan welcomes questions about his PG column or books. Drop an email to guitarservices@ aol.com or visit guitarservices.com for more info on his guitar repair workshops..

Review of the Boss-BR 800

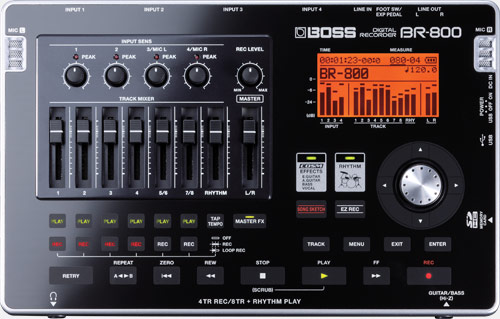
My Boss Br-800 has been the single best investment to my Home Studio. I have used it extensively for over 4 years now. It has been my go to Audio Interface, an easy to use Controls Surface, and an excellent Effects Processor. So I thought I'd share my thoughts with you about this little gem!


The BR-800 is a compact and lightweight digital audio recorder designed for ultimate versatility and convenience. The BR-800 provides 4 tracks of simultaneous recording, and 8 tracks of simultaneous playback. It has an additional stereo track that's dedicated to the onboard drum machine, which also includes an editor. The built-in stereo condenser mics lets you record anytime, anywhere without the need for extra equipment. Your files are captured to widely-available SD/SDHC memory cards, supporting capacities up to 32GB. A 1GB card is included to get you started.

The BR-800 has an easy-to-use interface that's based on touch sensors, giving you precision control over all features. An onboard effects processor gives you a wealth of guitar, bass, and vocal effects, while a "Song Sketch" feature provides quick stereo WAV recording. A USB connector allows you to use the BR-800 as a USB audio interface with your Mac or PC, as well as use it as a control surface for DAW applications. Cakewalk SONAR 8.5 LE (Cakewalk Sonar Music Production Software) software is even included for computer-based audio manipulation. For terrific versatility, the BR-800 can operate on a set of 6 AA batteries, USB bus power, or the included AC adapter.


After doing some research I have posted the cheapest price I have found for a new unit. I paid $449 over 4 years ago and this thing has steadily remained within that price range. So when I found it for only $365, I was tempted to buy another one!


Pros:

  • Compact and portable design, ideal for musicians, journalists, and more
  • 4 tracks of simultaneous recording, and 8 tracks of simultaneous playback
  • Dedicated stereo track for the onboard drum machine, which also includes an editor function
  • Built-in stereo condenser mic lets you record anytime, anywhere without the need for extra equipment
  • Records to widely-available SD/SDHC memory cards, supporting capacities up to 32GB. A 1GB card is included to get you started
  • Easy-to-use interface is based on touch sensors, giving you precision control over all features
  • Onboard effects processor gives you a wealth of guitar, bass, and vocal effects
  • "Song Sketch" feature provides quick stereo WAV recording
  • USB connector allows you to use the BR-800 as a USB audio interface with your Mac or PC, as well as use it as a control surface for DAW applications
  • Cakewalk SONAR 8.5 LE software is included for computer-based audio manipulation
  • Operates on a set of 6 AA batteries, USB bus power, or the included AC adapter for terrific versatility
  • 4 XLR inputs on the back of the unit, 4 trs 1/8 inputs on the back as well, and 1 high z on the front
  • Headphone input on the front of the unit for zero latency monitoring or night time jam sessions
  • Line in for recording from various sources 

Cons:

  • The Guitar to Bass simulator can have some hiccups and is not able to pick up polyphonic Bass chords without low end garble
  • Most of the effects that include distortion are "overdone" in my opinion, but can be toned down and shaped into something more feasible 
  • The touch screen panel can be hard to get used to and if it gets oily fingerprints they will have to be cleaned before it will work properly again
  • 24 bit recording is only available on while plugged in via USB
  • Of the 4 XLR preamps on the back of the unit, only one of them has phantom power
  • When using the Loop Record feature, there is a delay in the changing of tracks that can cause a little drop out of audio (1 sec. tops, see video)

Specs:

Simultaneous Rec Tracks 4
Simultaneous Play Tracks 8
Sample Rate 44.1kHz
Bit Rate 24-bit
Effects Yes
Compression Track Compression, Multiband Mastering Compression
Phantom Power Yes (1 channel)
Number of Mic Preamps 4
Audio Interface Yes
Computer Connectivity USB
Built-in Mics 2
Analog Inputs 5 x 1/4", 4 x XLR, 1 x 1/8", 1 x 1/4" (Footswitch)
Analog Outputs 1 x stereo RCA, 1 x 1/4" (Headphones)
USB 1 x Type B
Storage SD (up to 32GB)
Faders 8
Fader Throw Compact (short-throw)
Power DC 9V Adapter (Sold Separately), 2 x AA Batteries, USB Bus
Height 2.31"
Depth 7.25"
Width 11.44"
Weight 2 lbs                                                                                                            

What is Phase? How do you handle it?

In this video I talk a little about what Phase is, and some simple ways to check for it. I also explain a real simple way to fix it on an acoustic guitar that has been recorded DI and mic'd simultaneously. This is by no means the definitive guide on Phase, and only covers a small area, but there are several sources out there that go so far in depth that they lose the element of simple. I like simple. Simple solutions, simple answers, and simple explanations, so I have left it as simple as I can for now. I may go more in depth later if the need arises but for now I hope this is helpful.


Note:

A number of instruments are routinely recorded both acoustically and electrically, simultaneously. For example, electric bass is often recorded via both a DI box and a miked amp, while an acoustic guitar's piezo pickup system might be recorded alongside the signal from a condenser mic placed in front of the instrument, in some situations. In such cases, the waveform of the DI or pickup recording will precede the miked signal because of the time it takes for sound to travel from the cabinet speaker or instrument to the mic. The resultant phase cancellation can easily wreck the recording.
A quick fix for this is to invert the polarity of one of the signals, and see if this provides a more usable tone. It's almost as easy to tweak the miking distance for more options if neither polarity setting works out. A better method, though, is to re-align the two signals in some way by delaying the DI or pickup channel, either using an effect unit during recording, or by shifting one of the recorded tracks after the fact using your sequencer's audio-editing tools.

Hope this helps.

Tips For Playing Out

Most of us Home Studio guys and gals are musicians first and foremost. Therefore, from time to time we actually leave our Home Studios to display our talents live. Okay, so it has been awhile since I have played a show outside of my studio, and to more than just my wife and children. So as I was gathering up the gear, finishing up the set list, and generally packing for our weekend "stay-cation" in Bloomington Indiana, I thought I'd compile a small list of things (yes, I love lists) that are needed when you're thinking of playing out or are in preparation for just such a thing.

This is kinda subjective to each musician, as each one will have varying needs depending on what their instrument of choice is, but here goes.

1) A Set List- 

Okay, I know this sounds like the Kindergarten of tips, but you would be surprised how many musicians forget this critical element to a smoothly held show. There is nothing more unprofessional than a singer/songwriter setting for 2-3 minutes going "Hmmm, what should I sing next?" Now, I know that we must change that list at times to accommodate various situations that may arise, but it helps to have structure and guidance. (especially when in front of a crowd)


2) A Back Up- 

If you are a guitarist, this will really hit home. How many times has that High E string snapped at just the "right" time?! It pays dividends to have an extra set of strings on hand or two, and if you are fortunate enough even an extra guitar. I mean think about it, your loyal fan drives a distance, takes time away from their busy lives, and comes to watch a nobody perform. Then they get there and the guitar falls off its stand and the neck breaks! (Lord forbid) Another scenario is that if you are playing an electric make sure to have n extra cable on hand, extra picks, and an extra strap. Maybe that's to many extras, but I am a cautious guy. This thought of extras really can apply to any musician regardless of their instrument of choice.

3) Recon- 

I love using hose fancy military terms to something completely unrelated. Before you play, where ever it may be, know your venues preferences before you get there! Call them, ask questions, it will not only make you look more professional but it could save you a big headache. Some questions you need to ask is as follows:

  • Do you guys allow pictures/videos to be taken?

  • Are there any rules or specific guidelines that I need to know about?

  • What do I need to bring with me? An amp, a microphone, etc.?

  • Do you allow monetary tips to be accepted by the artist?


Those are just a few that I can think of. Oh. and do you like how I just squeezed another list in on ya?
Sneaky huh!? Another good thing to do is to go to the venue before hand, if possible, and get a visual on where you might perform, where the bathrooms are, etc.

4) Great Material-

When playing out, you have a short window of opportunity to "wow" your audience. You're not going to hold there attention very long, even if you are good, because for the most part people come to see bands or solo act that they already know and can sing along to. Now, if you are doing covers you might hold their attention a little longer if you're a good representation of who you are trying to cover. But for those of us, like myself, that have a set-list comprised of originals you want to perform your best stuff when the most people are present.

Though this is better caught then taught I hope that these few tips will help in some way to better prepare for a gig. If you have any tips concerning this topic let me know through email, or better yet comment below so we all can benefit! This blog/website has only been open a short while and has already received over 5,000 page views! Just think of all the people you could be helping out!

Have a blessed day!


5 Tips Every Mixing Engineer Should Know

While it's true that there are no hard and fast rules when it comes to mixing, there are some common grounds that nearly every engineer can meet on. Though this list could be exhaustive, I have tried to narrow it down to just five. (I don't know why I like five so much) Ok, so here we go!

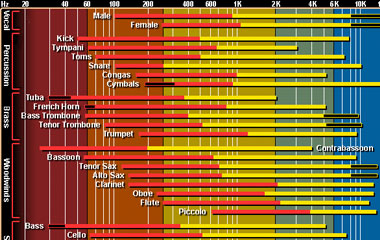
1) EQ- Most any engineer will agree that a narrow cut, as well as a wide boost, will sound the most natural. Although, every engineer has a different taste when it comes to the mix as a whole. (I.e. Some mix "darker" than others) A great tool I have used is the interactive frequency chart found here: EQ Chart


2) Room Trearment- Though the brand, amount needed, and such, is a topic of debate, the one thing everyone can agree on is that you at least need something. Whether you are mixing R&B, Rap, Rock, Pop, etc., you still will need some kind of treatment for your room. There are many options to choose from and really it depends on what you are working with, but there are definitive ways to know what you need, and where to put it. One such resource that I have used is the Room EQ Wizard. It is free and there are extensive tutorials on YouTube. Another great tip is the "Mirror trick", which will help you to pinpoint your areas of early reflection. You also need a good balance of treatment when it comes to treating for frequencies. Tom much can kill a rooms natural sound, and not enough can play tricks on your ears. There must be a yin and yang of bass treatment as well as mid and high frequencies as well. Click the picture below for some great deals on name brand acoustic foam. You can also check out this cheaper alternative Foam By Mail. They offer cheap acoustic open cell foam for a fraction of the cost!

3) Mixing Desk Placement- Yet again, this is a tip that is generally know by all, but for those who may not know, it really matters where you place your desk in the studio. The rule of thumb is to place your desk along the longest wall in the studio so as to minimize EQ anomalies. But for some of us, myself included, that is simply not an option. My plug ins will not allow me to put my desk where I want it, so now what? Well, that will be covered in the next tip!


4) Mixing Levels- Did you know that there is a sweet spot for mixing levels in terms of loudness? Yep, even some of the "greatest" engineers have stated that the ideal listening level is close to 85dbs! Or, another way to know how loud is to loud, is to get your listening levels to the point where you can still have a normal conversation with someone in the same room and not have to yell at them. Think I am making this up?! Here is the same thing I just said from Chris Lord-Alge, I think he's famous or something. So, as stated above, if your desk is not in the prime position in the room  by simply listening to your mix at lower levels you can drastically improve your EQ decisions. This also helps to combat a lot of the issues of a room that's either not treated at all, or treated very poorly.Then of course there is always the option to mix on headphones! Yes, I said that! Believe it or not there are quite a few industry leaders with some clout that are promoting this idea as well! I am sure you've heard of FocusRite?! They actually developed a VRM headphone monitoring system which emulates the sounds of several famous reference monitors wihtin your headphones! Pretty cool!


5) Get It Right At The Source- One of the best ways to get great mixes is to record great sounding takes. The cliche of "Fix it in the Mix" is a fallacy! You cannot polish a turd, and you can't fix some things no matter how good you are! This has been shouted from the rooftops and yet still people are trying to take average recordings and turn them into polished Masters. The reason why the "big studio" guys can get such great sounding mixes and masters is because their tracks were recorded well. It really comes down to about 20% gear, 20% engineer, and 60% captured sounds. My mixing mentors have told me time and time again to get it right at the source before you do anything else! Also, just take a moment to watch some Pensado's Place and just listen to the tracks he is working with. It will open your eyes, and your ears to a whole new world of thought.


A Great Product for the Home Studio


A great Home Studio addition and one of staples of my Home Studio has been this little gem!


 This my friends is the Boss Br-800 and it is loaded with goodies! On top of being able to jam with your headphones for late night sessions you also get to turn that guitar into a bass, and many other things, to numerous to mention. I have been able to use this to take a song from start to finish all the way through the Mastering process with this bad boy! Included within the Boss Br-800 is a huge variety of completely customizable presets for vocals, guitar, bass, and even some excellent drum patterns. The drum patterns contained within are also customizable with the included drum map manager. As if that wasn't enough, there is an LE version of the Cakewalk Sonar Music Production  Software!

Literally, I brought this thing home, plugged it in and produced a song in under 4 hours! A one man bands dream come true! I was able to pick a drum track, lay down my guitar, put a bass track behind it, and perform the solo guitar after that. Throw in some great sounding vocal effects and ta-da!

If you are in the market for an excellent audio interface that can take your recordings to the next level, and especially if you are a solo artist, the Boss Br-800 is for you! Here are the specs below. Happy recording!

•BOSS BR-800 Specs


Now Available! HSS-Guitar Purchase Guide

WAIT! Don't buy that guitar just yet! There are some things you need to know first, things that could save you a ton of money, and set you up for a better outcome. 

Wanna know some things that dealers don't want you to know? Wanna utilize the same techniques that have saved me from making big buying mistakes, and kept a little green in my pocket for some accessories?

Check out the "Guitar Purchase Guide"! The first in a series of workshops from Home $tudio $implified. The price is low enough to still make that purchase you're wanting to make, but walk out of the store without regrets!

Listen to HSS Episode 007 found here  (iTunes or RSS Feed) for a promo code!


Great Guitar Care Kit

I clean and refurbish a LOT of guitars. Just this week I have revived 4 guitars that were otherwise cast off as useless. One thing they all have in common however, is that all of them were cleaned using the Dunlop 65 Maintenance Kit. (Disclaimer: I am not endorsed, sponsored, or anything else by the aforementioned company)

Each one of the sprays and oils have their own strengths and all of them do exactly what they say. I have developed a method by which I can turn a flea market cast away into gem, and this 65 system makes it easy! 


My personal favorite is the deep conditioner. On a rosewood fretboard, this oil causes the deep richness of the wood to breath again. If you are in need of a great cleaning system, give this a try!

Playability Trumps All

Recently I had the opportunity to play some high end guitars. In fact the store I was in, “Smoky Mountain Guitars” was sort of a botique guitar shop. There was no guitar under $3000 in the building! Obviously that was way out of my price range but I was able to play one that caught my eye. It was a rare solid mahogany acoustic guitar that looked amazing! I picked it up and began to play expecting to be blown away with the ease of play. Nope. It felt awkward, the fretboard was rough, the sound was just…alright, and the feel of it in my arms was not so much that I couldn’t put it down. Quite frankly, I thought, what a bummer.
I was expecting to turn into the worlds greatest guitarist by picking that up right?! Hahaha, well not so much. The fact is, when I came home to “Beulah” (my Alvarez acoustic/electric) I picked it up and felt right at home. No, it is not a high end guitar, but I can play it and feel comfortable doing so. That trumps a price tag any day! 
The same goes with all aspects of Home Studio life. Why would we spend more money on something that we either can’t use, don’t know how to use, or may not ever use at all? Most of the time I see it as a musicians supposed quick fix. “Well, if I get _______________then I will sound good!” The fact is we must master what we have first in order to move on to something better, but better is NOT always a higher price tag. I would even venture to say that there are several mid priced instruments that play just as good if not better than the higher priced ones. These topics were covered in episode #1 & #4 of the HSS podcast in a different sense. This is my plea to all who would hear! “Don’t fall for the hype, and don’t let a salesman tell you what you like!”
Let me ask you a question, and I will leave you with this thought today…
What have you recently purchased that you can look back on now and say, “did I really need that”? Secondly, What do you own that you have kept simply because it’s expensive? And thirdly, what could you use that could easily replace that thing that is collecting dust? It’s all about the playability! If you don’t play with it, or it’s a struggle and a joy kill to do so, get rid of it for something useful.

Which Body Style Is Right For Me?


Though some can be hard to spot, there are actually a variety of different acoustic guitar bodies. So, how do we simplify our choice of which one is right for our style of playing? 


Well, the overall consensus is that the Grand Auditorium style is the most well rounded, and widely used, for all styles of music. It also delivers ease of play for most every artist. It is the "middle of the road" approach. 

So, are you all confused on which body style to get? Just go "middle of the road". If that doesn't feel right you will have a good starting point to go from. You will know if you need a smaller or larger body right out of the gate, and that could save you a lot of time searching for "The One".