Showing posts with label headphones. Show all posts

The Essential Role of TOZO Noise-Canceling Headphones in Home Studios

In recent years, home studios have revolutionized the music and audio production industry, making it possible for individuals to create professional-quality work from the comfort of their homes. As technology evolves, the tools available for these home setups continue to grow in sophistication and accessibility. Among these tools, TOZO noise-canceling headphones have emerged as an essential asset for home studio owners. With their impeccable sound quality, advanced noise-cancellation technology, and affordability, TOZO headphones stand out as a must-have. This blog post will explore why TOZO noise-canceling headphones are critical for home studios and how they enhance productivity and creativity.

Why Noise-Canceling Headphones Matter in a Home Studio

Before diving into TOZO's offerings, let’s examine why noise-canceling headphones are indispensable for a home studio. Unlike professional studio environments, home studios often lack comprehensive acoustic treatment. Ambient noise from traffic, family members, pets, or neighbors can interfere with critical listening tasks such as mixing, mastering, and tracking. Noise-canceling headphones mitigate these distractions, providing a focused listening environment and enabling you to hear every detail of your audio.

Noise-canceling headphones are particularly useful during mixing and mastering sessions, where precision is paramount. Subtle frequencies and intricate soundstage details can make or break a mix. Without proper isolation, these nuances might be missed, resulting in subpar audio quality. High-quality noise-canceling headphones ensure that external noise doesn’t compromise your ability to make informed sonic decisions.

Key Features of TOZO Noise-Canceling Headphones

TOZO headphones have earned a reputation for delivering top-tier performance at an accessible price point. Here are the standout features that make them ideal for home studio use:

1. Advanced Noise-Cancellation Technology

TOZO headphones use hybrid active noise-canceling (ANC) technology, combining feedforward and feedback microphones to cancel out a wide range of external noises. This ensures a quiet and immersive listening experience, even in noisy environments. Whether you’re editing a podcast or mixing a song, the ANC feature allows you to focus solely on your audio.

2. Exceptional Sound Quality

One of the most critical aspects of studio headphones is sound accuracy. TOZO headphones are engineered with high-resolution audio drivers that deliver a balanced frequency response. The bass is tight and controlled, the mids are clear, and the highs are detailed without being harsh. This neutral sound profile ensures you’re hearing your audio as it truly is, enabling accurate mixing and mastering decisions.

3. Comfortable Design for Long Sessions

Home studio sessions often stretch for hours, making comfort a top priority. TOZO headphones feature ergonomic designs with plush ear cushions and adjustable headbands to ensure a snug fit. Their lightweight build reduces fatigue, allowing you to work on your projects for extended periods without discomfort.

4. Wireless and Wired Options

Flexibility is another area where TOZO excels. Their headphones offer both wireless and wired modes, catering to different use cases. The Bluetooth connectivity is reliable, with low latency, making it suitable for casual listening or referencing. For critical listening tasks, the wired mode ensures an uncompressed audio signal, preserving the integrity of your work.

5. Long Battery Life

For those who prefer wireless functionality, TOZO headphones provide impressive battery life. Depending on the model, you can expect up to 30 hours of continuous playback on a single charge. This ensures that you won’t be interrupted during long sessions.

6. Affordability

TOZO headphones offer professional-grade features at a fraction of the cost of high-end studio headphones. This makes them accessible to home studio owners working within tight budgets, without sacrificing quality.

How TOZO Headphones Enhance Home Studio Workflows

TOZO headphones are more than just an accessory; they’re a tool that can significantly improve your home studio workflow. Here’s how:

1. Precision in Mixing and Mastering

The accurate sound reproduction of TOZO headphones ensures that you can identify issues in your mix, such as frequency imbalances or phase problems. This precision allows you to make adjustments that translate well across different playback systems, from car speakers to high-end audio systems.

2. Isolation During Tracking

When recording vocals or instruments, bleed from playback monitors can be a problem. TOZO’s noise-canceling headphones provide isolation, ensuring that the backing track doesn’t interfere with the recording. This results in cleaner takes and less time spent on editing.

3. Focus and Productivity

Distractions can derail your creative process. With TOZO’s noise-cancellation, you can block out the outside world and immerse yourself in your work. This focused environment fosters creativity and productivity, allowing you to achieve more in less time.

4. Versatility Across Applications

TOZO headphones aren’t limited to music production. They’re equally effective for podcast editing, video production, and general listening. Their versatility makes them a valuable addition to any home studio.

TOZO Models Recommended for Home Studios

TOZO offers several models of noise-canceling headphones, each with features tailored to different needs. Here are some models highly recommended for home studio use:

TOZO NC7

The NC7 is a flagship model with state-of-the-art ANC technology and a 40mm dynamic driver for superior sound quality. Its foldable design and extended battery life make it a practical choice for home studio users.

TOZO NC9

The NC9 takes things a step further with an upgraded noise-cancellation chip and transparency mode. This feature allows you to hear ambient sounds when needed, adding convenience during collaborative sessions.

TOZO NC2

For budget-conscious users, the NC2 offers excellent performance at an affordable price. It features hybrid ANC, balanced sound, and a comfortable design, making it a solid choice for home studios.

Tips for Getting the Most Out of Your TOZO Headphones

To maximize the potential of your TOZO noise-canceling headphones, consider the following tips:

  1. Optimize Fit: Ensure the ear cups create a proper seal around your ears to enhance noise cancellation and bass response.

  2. Use Wired Mode for Mixing: When working on critical tasks like mixing and mastering, use the wired mode to eliminate latency and preserve audio fidelity.

  3. Maintain Battery Health: For wireless models, avoid overcharging to prolong battery life.

  4. Pair With Acoustic Treatment: While TOZO headphones are excellent for isolating sound, combining them with basic acoustic treatment in your home studio can further improve your listening environment.

  5. Clean Regularly: Keep your headphones clean to maintain their comfort and longevity. Use a soft cloth to wipe down the ear cups and headband.

Conclusion

TOZO noise-canceling headphones are a game-changer for home studio owners. They combine advanced technology, exceptional sound quality, and user-friendly design at an affordable price point, making professional-grade audio production accessible to everyone. Whether you’re a seasoned producer or just starting your journey, investing in a pair of TOZO headphones can elevate your home studio experience and help you achieve your creative goals.

With their versatility, precision, and affordability, TOZO noise-canceling headphones are not just a tool but an essential companion in the modern home studio. Don’t let external distractions or subpar equipment hold you back—step up your audio game with TOZO, and bring your creative vision to life.


Recording with Purpose

http://bit.ly/HSS_YouTube_Channel

By now I hope you have realized the futility of "fixing things in the mix". Not only does it take more time to "fix" things, but in the end everyone loses. The artist you may represent (even if it's yourself), the listener, your mom... (that is if she listens to your work) Everyone will be subjected to the an over processed audio nightmare! Getting a great take, from a great artist, who gave a great performance, without taking a great deal of time to set up mics and position them properly is like playing Russian roulette. You may get a good take by just throwing up a mic where you think it should go, but you may not also. You may be able to even get it sounding decent after an hour of grueling work and 133 plug-ins. However, what if when you got that amazing take, and incorporated it into the mix later, you thought "Hey that actually sounds pretty good the way it is!"

What if, after saying that, instead of struggling to find the right plug-in to make it sound good, you were struggling to find a plug-in at all to even put on it in the first place. Now, I know that in today's world of gear crazy, plug-in happy, home studios, this seems like some Utopia that is not attainable without the latest Wave's deal or that "Stupid Deal of the Day". Yet, in all actuality it is possible!

All it takes is some time to record with purpose. First you have to decide for yourself what is the purpose of the instrument/s you're recording? Are they supportive, or are they the leading elements that make up the song? Do they need a certain sound or tone to set well? Think about it as if you were recording it into your DAW without any hope of ever changing it again. Does the electric guitar need to be brighter to even out the low-mids that are panned hard left from an acoustic part? Maybe it needs to be darker to even out the hype from the keys? 

The best way to know for certain is to hear it as it is being recorded in real time. Break out the ol' headphones and crank up the monitoring level so you can clearly hear what that mic is doing to the sound. Small movements from a mic can dramatically effect the tone of something so move it around quickly until you get in the ballpark of what your looking for and then slow way down, moving it only by inches one way or another. Once you got that sweet spot, remember where you had and mark it in some way if you can. (Tape, sharpie, chalk, etc. use your better judgment as to which would work best) That way you can get back to that tone again if you should need to redo a riff or overdub.

Ultimately, you want to be thinking about the end result. What would you want it to sound like when it's all said and done? By taking this little bit of extra time up front and getting just the right sound going in, you will save a ton of time, CPU, and hair when it comes to mixing. 

I am starting a series on the YouTube channel where I am going to be covering this and other things related as I work through a song step by step from idea to finished product, follow along with me and make something of your own as well! When its all said and done, I'd love to hear what you got! Until next time, go make some music!

You can subscribe to the channel here: http://bit.ly/HSS_YouTube_Channel

Let Your Mix Be Heard

Mixing is very much a mental ascent. There are elements that require a very precise touch, backed by head knowledge and experience. However, there are areas that necessitate a more "blind" approach. This is what I want to cover today.

Now, when I deliver this there will be many who bulk at it and many who never actually put it into practice. Why? Because it seems so simple. DON'T be one of those who obtains loads of tips, tricks, and head knowledge but never experiments or applies. 

Ok, so enough preface. What's the hack?! Here it is...

Close your eyes.

Yep, I know revelatory, huh? But don't just brush this aside. How many times have you went to adjust something in your DAW and "heard" an audible difference only to realize that that knob you were tweaking wasn't moving at all! (Guilty!)

We are so visual. We want to see results. Yet, mixing is not based off of sight, it is sound we're after. Therefore by eliminating our body's natural inhibition to "see" results we are giving ear to what the craft is calling for, audible results.


Action Step:

If you have a Surface Controller this will be easier to do but if not it is still easily achieved by using your mouse or track pad. 

1) Pull up a track in your mix and solo it. 
2) Now, open up that "go to" EQ you love.
3) Remove any settings that may be on it. If you like how it sounds then write down those settings before clearing it out. If it has no settings then make some quick adjustments from your gut. Write them down and clear it out.
4) Pick a band and cut it by -3dbs with a moderate Q (1.5-3.0)
5) Now grab a knob on your Surface Controller or click and hold that same thing with your mouse and close your eyes.
6) Sweep around the frequency spectrum without opening your eyes. 7) Listen critically to the track and hear where that cut makes the most effective difference to get closer to the sound you're after.

Note: If you wrote down your settings from the previous adjustments, look at where your setting ended up and see if it matches your previous one. Which one sounds better? What did you discover!?

New Mixing Headphones

If you have been following me on my Home Studio journey, you know that I am an advocate of Mixing on headphones. Though many say it is impossible, if done with the right goals in mind it can be very rewarding and enjoyable. Recently, I bought me a set of semi-open backed headphones for just such a task. I wanted to let you know what I thought of them so that if you were thinking of buying a pair you could get an unbiased opinion.

The headphones in question are the AKG K 240 Semi-Open Studio Headphones. Now, upon first glance I thought "these things look cheap". However, their appearance and build are another thing all together. Though they do have a "cheapesh" look to them (yeah I made that word up), their build is pretty solid. They are very light weight and above all else... They sound amazing! No, not amazing like an average listener would find amazing. (Smiley face EQ curve, overly bassy, sparkly) On the contrary these are very reference like. I mixed a song on them in 30 minutes and it translated well! I went back and checked the same mix on my M-Audio BX5a's and there were only a few adjustments that needed to be made! This was a win for me! I picked these up at a great price and you can to, click the picture or the link above and get a great deal while also helping out a fellow engineer at no extra cost to you. Have an awesome day!

Review of the Boss-BR 800

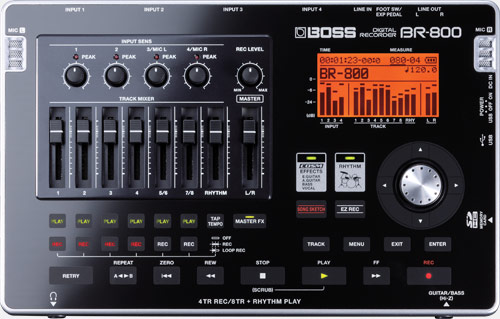
My Boss Br-800 has been the single best investment to my Home Studio. I have used it extensively for over 4 years now. It has been my go to Audio Interface, an easy to use Controls Surface, and an excellent Effects Processor. So I thought I'd share my thoughts with you about this little gem!


The BR-800 is a compact and lightweight digital audio recorder designed for ultimate versatility and convenience. The BR-800 provides 4 tracks of simultaneous recording, and 8 tracks of simultaneous playback. It has an additional stereo track that's dedicated to the onboard drum machine, which also includes an editor. The built-in stereo condenser mics lets you record anytime, anywhere without the need for extra equipment. Your files are captured to widely-available SD/SDHC memory cards, supporting capacities up to 32GB. A 1GB card is included to get you started.

The BR-800 has an easy-to-use interface that's based on touch sensors, giving you precision control over all features. An onboard effects processor gives you a wealth of guitar, bass, and vocal effects, while a "Song Sketch" feature provides quick stereo WAV recording. A USB connector allows you to use the BR-800 as a USB audio interface with your Mac or PC, as well as use it as a control surface for DAW applications. Cakewalk SONAR 8.5 LE (Cakewalk Sonar Music Production Software) software is even included for computer-based audio manipulation. For terrific versatility, the BR-800 can operate on a set of 6 AA batteries, USB bus power, or the included AC adapter.


After doing some research I have posted the cheapest price I have found for a new unit. I paid $449 over 4 years ago and this thing has steadily remained within that price range. So when I found it for only $365, I was tempted to buy another one!


Pros:

  • Compact and portable design, ideal for musicians, journalists, and more
  • 4 tracks of simultaneous recording, and 8 tracks of simultaneous playback
  • Dedicated stereo track for the onboard drum machine, which also includes an editor function
  • Built-in stereo condenser mic lets you record anytime, anywhere without the need for extra equipment
  • Records to widely-available SD/SDHC memory cards, supporting capacities up to 32GB. A 1GB card is included to get you started
  • Easy-to-use interface is based on touch sensors, giving you precision control over all features
  • Onboard effects processor gives you a wealth of guitar, bass, and vocal effects
  • "Song Sketch" feature provides quick stereo WAV recording
  • USB connector allows you to use the BR-800 as a USB audio interface with your Mac or PC, as well as use it as a control surface for DAW applications
  • Cakewalk SONAR 8.5 LE software is included for computer-based audio manipulation
  • Operates on a set of 6 AA batteries, USB bus power, or the included AC adapter for terrific versatility
  • 4 XLR inputs on the back of the unit, 4 trs 1/8 inputs on the back as well, and 1 high z on the front
  • Headphone input on the front of the unit for zero latency monitoring or night time jam sessions
  • Line in for recording from various sources 

Cons:

  • The Guitar to Bass simulator can have some hiccups and is not able to pick up polyphonic Bass chords without low end garble
  • Most of the effects that include distortion are "overdone" in my opinion, but can be toned down and shaped into something more feasible 
  • The touch screen panel can be hard to get used to and if it gets oily fingerprints they will have to be cleaned before it will work properly again
  • 24 bit recording is only available on while plugged in via USB
  • Of the 4 XLR preamps on the back of the unit, only one of them has phantom power
  • When using the Loop Record feature, there is a delay in the changing of tracks that can cause a little drop out of audio (1 sec. tops, see video)

Specs:

Simultaneous Rec Tracks 4
Simultaneous Play Tracks 8
Sample Rate 44.1kHz
Bit Rate 24-bit
Effects Yes
Compression Track Compression, Multiband Mastering Compression
Phantom Power Yes (1 channel)
Number of Mic Preamps 4
Audio Interface Yes
Computer Connectivity USB
Built-in Mics 2
Analog Inputs 5 x 1/4", 4 x XLR, 1 x 1/8", 1 x 1/4" (Footswitch)
Analog Outputs 1 x stereo RCA, 1 x 1/4" (Headphones)
USB 1 x Type B
Storage SD (up to 32GB)
Faders 8
Fader Throw Compact (short-throw)
Power DC 9V Adapter (Sold Separately), 2 x AA Batteries, USB Bus
Height 2.31"
Depth 7.25"
Width 11.44"
Weight 2 lbs                                                                                                            

5 Tips Every Mixing Engineer Should Know

While it's true that there are no hard and fast rules when it comes to mixing, there are some common grounds that nearly every engineer can meet on. Though this list could be exhaustive, I have tried to narrow it down to just five. (I don't know why I like five so much) Ok, so here we go!

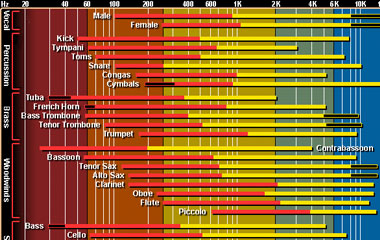
1) EQ- Most any engineer will agree that a narrow cut, as well as a wide boost, will sound the most natural. Although, every engineer has a different taste when it comes to the mix as a whole. (I.e. Some mix "darker" than others) A great tool I have used is the interactive frequency chart found here: EQ Chart


2) Room Trearment- Though the brand, amount needed, and such, is a topic of debate, the one thing everyone can agree on is that you at least need something. Whether you are mixing R&B, Rap, Rock, Pop, etc., you still will need some kind of treatment for your room. There are many options to choose from and really it depends on what you are working with, but there are definitive ways to know what you need, and where to put it. One such resource that I have used is the Room EQ Wizard. It is free and there are extensive tutorials on YouTube. Another great tip is the "Mirror trick", which will help you to pinpoint your areas of early reflection. You also need a good balance of treatment when it comes to treating for frequencies. Tom much can kill a rooms natural sound, and not enough can play tricks on your ears. There must be a yin and yang of bass treatment as well as mid and high frequencies as well. Click the picture below for some great deals on name brand acoustic foam. You can also check out this cheaper alternative Foam By Mail. They offer cheap acoustic open cell foam for a fraction of the cost!

3) Mixing Desk Placement- Yet again, this is a tip that is generally know by all, but for those who may not know, it really matters where you place your desk in the studio. The rule of thumb is to place your desk along the longest wall in the studio so as to minimize EQ anomalies. But for some of us, myself included, that is simply not an option. My plug ins will not allow me to put my desk where I want it, so now what? Well, that will be covered in the next tip!


4) Mixing Levels- Did you know that there is a sweet spot for mixing levels in terms of loudness? Yep, even some of the "greatest" engineers have stated that the ideal listening level is close to 85dbs! Or, another way to know how loud is to loud, is to get your listening levels to the point where you can still have a normal conversation with someone in the same room and not have to yell at them. Think I am making this up?! Here is the same thing I just said from Chris Lord-Alge, I think he's famous or something. So, as stated above, if your desk is not in the prime position in the room  by simply listening to your mix at lower levels you can drastically improve your EQ decisions. This also helps to combat a lot of the issues of a room that's either not treated at all, or treated very poorly.Then of course there is always the option to mix on headphones! Yes, I said that! Believe it or not there are quite a few industry leaders with some clout that are promoting this idea as well! I am sure you've heard of FocusRite?! They actually developed a VRM headphone monitoring system which emulates the sounds of several famous reference monitors wihtin your headphones! Pretty cool!


5) Get It Right At The Source- One of the best ways to get great mixes is to record great sounding takes. The cliche of "Fix it in the Mix" is a fallacy! You cannot polish a turd, and you can't fix some things no matter how good you are! This has been shouted from the rooftops and yet still people are trying to take average recordings and turn them into polished Masters. The reason why the "big studio" guys can get such great sounding mixes and masters is because their tracks were recorded well. It really comes down to about 20% gear, 20% engineer, and 60% captured sounds. My mixing mentors have told me time and time again to get it right at the source before you do anything else! Also, just take a moment to watch some Pensado's Place and just listen to the tracks he is working with. It will open your eyes, and your ears to a whole new world of thought.


Five Things Every Home Studio Needs

    There are few things that the Home Studio hobbyist doesn't want in their arsenal. However, if we had our way we'd be over stocked and packed into a tiny corner surrounded by gear. Yet, of all the things we want, there are truly only a handful of things we truly need. I am a big fan of lists, and a huge fan of simple. So, I have compiled a list below of things that every Home Studio, regardless of their genre or size, really needs. Also, if you have listened to the podcast at all, you would know that I recently made a confession. That being, I am a "cheap-skate". I love FREE but cheap is my second favorite. So included in the list are links to good products at a cheap price!

1) Pop Filter

If you have ever heard a recording without one, you remember it, but it's not a good memory. The plosives are annoying, unprofessional, and unable to be removed from a recording. Whether your artist is male or female, if they are laying down a vocal take, this is a must! Click this pic below to get a great pop filter at an amazing price!


2) A Good Set of Headphones

When it comes to hearing the nuances of the acoustic, and making informed EQ decisions, I love to reach for my headphones! In fact, I even do quite a bit of mixing in my headphones! Yes, I said that. In fact I covered this in a previous post here on the site. (Mixing With Headphones) I personally use the Audio Technica Art Monitor Headphones but am really wanting to get my hands on these!


3) An Audio Interface

Getting your music into a digital format has never been easier for the Home Studio hobbyist. There are so many options, and most are very reasonably priced. I personally use the BOSS BR-800 as it has so many options and is loaded with extras, but there are cheaper alternatives. If you are only recording yourself, this item should suffice.


4) Good Cables

When it comes to creating a good signal chain, your cables are key. You don't have to go broke getting them however! There are some really "good" cables out there, and there are some REALLY "bad" cables. I have bought both and can honestly say that the best bang for your buck, in my opinion, are the Hosa Brand Cables. They are of commendable quality and rugged, as well as cheap. (I love cheap!)


5) A Good Condenser Mic

Now I have been rather partial about this mic, but I am just so sold on the quality and versatility that this mic brings to the Home Studio that I can't quit plugging it. It is cheap, it sounds great on a wide variety of sources and it is USB. When your first starting out, this mic will get you up and running quickly! Four polar patterns, excellent sound quality, gain and volume knobs, and latency free headphone monitoring are just a few things to name. I highly recommend this mic!


In fact, I used this mic to record all of the vocals and all of the acoustic guitar on my first album! I hope this helps! If you'd like more great tips like this and videos related to the Home Studio please sign up below for my bi-weekly email list!


Subscribe to our mailing list

* indicates required

A Great Product for the Home Studio


A great Home Studio addition and one of staples of my Home Studio has been this little gem!


 This my friends is the Boss Br-800 and it is loaded with goodies! On top of being able to jam with your headphones for late night sessions you also get to turn that guitar into a bass, and many other things, to numerous to mention. I have been able to use this to take a song from start to finish all the way through the Mastering process with this bad boy! Included within the Boss Br-800 is a huge variety of completely customizable presets for vocals, guitar, bass, and even some excellent drum patterns. The drum patterns contained within are also customizable with the included drum map manager. As if that wasn't enough, there is an LE version of the Cakewalk Sonar Music Production  Software!

Literally, I brought this thing home, plugged it in and produced a song in under 4 hours! A one man bands dream come true! I was able to pick a drum track, lay down my guitar, put a bass track behind it, and perform the solo guitar after that. Throw in some great sounding vocal effects and ta-da!

If you are in the market for an excellent audio interface that can take your recordings to the next level, and especially if you are a solo artist, the Boss Br-800 is for you! Here are the specs below. Happy recording!

BOSS BR-800 Specs


Mixing Day!

Well Thursday proved to be eventful! I finished refurbishing two more guitars and did A LOT of mixing!


Most of the songs were already close to being done, but I decided in order to keep the creative flow going for the new album (In Pursuit), that I would get them close but not stress over the small stuff. Then on Thursday I would do a batch mix of all that I had up to this point. It actually worked out pretty good. I was a little sidetracked on more than one occasion (crawling under the mother-in-laws house to remove a skunk, repairing the toiliet in our bathroom, honey do lists,etc.) but somehow I managed to get quite a bit done.

For those of you who have been following the podcasts (itunes & rss feed is on the sidebar if not) you might know that I haven't uploaded an episode in awhile. Unfortunately, I reached my data cap and have had to wait until the next month. However, soon and very soon, I will be releasing a new podcast episode where I will be covering my “batch mixing” process and I will also be rolling out some great new, and I must say, exciting things.

If you have listened to the podcasts and you have any episode ideas, let me know! Also, please remember to rate it and leave a review, this will help others to find all that rambling as well!


Well, gonna get back to song #6 I believe it is now... Whew! Just thought I’d take a break and give my ears a rest. What are you doing with your music right now? I'd like to hear your thoughts on “batch mixing!

Mixing with Headphones!?!

There are so many "rules" to mixing that I break nearly everyday, and despite what popular opinion states, my mixes don't seem any less desirable when mixed on headphones. Much like anything else, I always check them by the "rules". (On my reference monitors) But, I don't have to adjust much usually, and sometimes not at all! 

Anytime you buy new monitors you have to get used to them, if you switch studios or move to a different room to record, you have to adjust to that as well. The same goes with mixing on headphones. Once you get used to them, learn their strengths and weaknesses, you can churn out some great mixes on them!

Here are some tips to mixing on headphones that have got me great results.

1) If you are using closed back headphones make sure to expect more bass on the mix. Open backed headphones are more accurate to represent bass levels.

2) Mix it just like you want to hear it, then reference on other sources to pick up on the discrepancies. However, don't expect bad speakers to make a good mix sound great. 

3) Keep a copy of music you love with you, music that has been professionally mixed and mastered. These songs will help you know what your mix should strive to be on the different sources you are referencing on.

4) Don't turn up that volume just because your neighbors can't hear it now. Listen at a level that won't tire your ears to quick.

5) Make sure that you invest in a set of comfortable headphones. I use the Audio Technica ATH a700's. Their re-design of the headrest, that they call wings, set so comfortably on my head that they aren't even noticeable.