Showing posts with label mixing. Show all posts

Cakewalk Sonar Is Back!


Cakewalk Sonar Returns: A Rebranded Powerhouse for Music Production

The wait is over—Cakewalk Sonar is back. After years of evolution under BandLab, the beloved DAW has been refreshed, rebranded, and packed with new features designed to elevate your music production experience. But before you dive in, let's break down what's changed, what's new, and whether this update is worth your time.

A Name That Resonates: Why the Rebrand?

Cakewalk by BandLab is now Cakewalk Sonar, marking a return to its roots while signaling a more focused and streamlined product line. For long-time users, the nostalgia is real, but the rebrand isn't just about sentiment—it’s about reestablishing Sonar as a premier DAW. Best of all, the new Sonar won’t overwrite your existing installation, so you can explore it risk-free.


A Fresh Look: User Interface & Customization

Sonar’s new UI refresh is sleek, modern, and more customizable than ever. With multiple themes—including the fan-favorite Tungsten—users can tailor their experience to their visual preferences. DPI Awareness is another welcome addition, ensuring high-resolution displays render crisp, clear text and graphics. No more blurry UI elements!

Pro Tip: Setting a default theme in Preferences can help maintain visual consistency across projects, reducing eye strain during long sessions.


Enhanced Workflow: Track Manager Upgrades

Efficiency is the name of the game, and Sonar’s Track Manager is stepping up. Users can now create per-project presets, toggle views more quickly, and enjoy a more intuitive layout. Whether you need a clutter-free session or custom track views for vocals, drums, or synths, the new Track Manager ensures that everything is just a click away.


XSampler: Your Built-in Sampler

No more hunting for third-party plugins for basic sampling—Sonar introduces XSampler, a built-in sampler that lets users import, tweak, and play audio as an instrument. This feature is perfect for producers looking to experiment with sound design without leaving the DAW.


Spectrum Analyzer: Precision Mixing Made Easy

Mixing engineers will appreciate the new Spectrum Analyzer, now integrated directly into the Console view, Inspector, and ProChannel. Real-time frequency analysis means better EQ decisions and faster mixing workflows.


Plugin Upgrades & Oversampling: Cleaner Sound, More Power

Plugins received some much-needed love in this update. TH-U Cakewalk Edition now delivers pro-level amp modeling, while the ProChannel Concrete Limiter ensures transparent peak control. But the real standout? Oversampling, now up to 16x. This means reduced aliasing, higher-quality processing, and overall cleaner audio.

Pro Tip: Use oversampling only when printing your mix to save CPU power during production.


Smarter Export & Backup: No More Lost Files

Sonar introduces the Cakewalk Interchange Format (CXF) for seamless project transfers across Cakewalk platforms, plus the Cakewalk ZIP format for archiving projects. These updates eliminate the common headache of missing audio files when moving sessions between systems.

Features Being Retired

Not everything made the cut in this new iteration. Here are a few notable exclusions:

  • Custom UI Themes: Legacy themes are no longer supported, meaning user-created color schemes won’t carry over.

  • ProChannel FX Chains: While FX chains remain, ProChannel-specific chains have been removed.

  • Older DX Plugins: Some DirectX plugins may not function as expected as Sonar shifts focus to modern VST formats.

  • TH3 Support Dropped: Sonar will automatically replace TH3 with TH-U, though existing TH3 presets won’t transfer.

  • No Free Version: Unlike Cakewalk by BandLab, Sonar is now a paid product, with Cakewalk Next remaining free for basic users.

Who Stands to Benefit the Most?

Singer-Songwriters: XSampler allows quick conversion of voice memos into playable instruments, making layering harmonies effortless.


Mix Engineers: The integrated Spectrum Analyzer provides visual feedback in real-time, enhancing EQ accuracy.

Live Musicians: Oversampling up to 16x ensures cleaner recordings for high-fidelity performances.

Producers with Large Sessions: Track Manager presets simplify complex projects, reducing the need for endless scrolling and manual organization.

The Verdict: Is It Worth the Upgrade?

Absolutely. With a refined UI, workflow improvements, and powerful new features, Cakewalk Sonar is a solid step forward. For existing users, the transition is seamless. For newcomers, it’s the perfect time to dive into one of the most capable DAWs on the market. Whether you're producing, mixing, or composing, Sonar has the tools to help you craft professional-quality music.

What’s your favorite update? Let us know in the comments!


7 Of The Best Free Guitar Pedal Plugins?

Our top pick for the best free guitar pedal plugin is TSE808 2.0 Lite, a software recreation of the legendary Ibanez Tube Screamer 808—the overdrive pedal that has launched a thousand solos.

For metalheads who think "gain" is just a suggestion, Mercuriall Metal Area takes the crown for best metal guitar pedal plugin. This beast emulates the infamous BOSS Metal Zone, loved and loathed in equal measure.

If you’re after dreamy, swirling textures, Mercuriall Chorus WS-1 is a fantastic choice, bringing the legendary BOSS CE-2 Chorus Ensemble to your DAW.

Here’s our list of the 7 best free guitar pedal plugins:

  1. TSE808 2.0 Lite (Best Overdrive) - Download Here

  2. Mercuriall Metal Area (Best Metal Distortion) - Download Here

  3. Ignite Amps Pro F.E.T. (Best JFET Emulation) - Download Here

  4. Mercuriall Chorus WS-1 (Best Chorus) - Download Here

  5. TSE R47 (Best RAT Emulation) - Download Here

  6. Heptode Deep Crunch (Best Amp Distortion) - Download Here

  7. Ignite Amps TSB1 Tyrant Screamer - Download Here


Best TS Emulation: TSE808 2.0 Lite

Rating: ⭐⭐⭐⭐☆

Why We Love It:

  • Smooth, full overdrive that mimics the warmth of a cranked tube amp.

  • Faithful recreation of the Ibanez TS808 Tube Screamer—because some things never go out of style.

  • Mono/Stereo processing and Hi/Lo quality mode.

View on TSE Audio


Best MT-2 Emulation: Mercuriall Metal Area

Rating: ⭐⭐⭐⭐☆

Why We Love It:

  • Unique dual-gain circuitry for maximum face-melting distortion.

  • 3-band EQ with semi-parametric midrange control (because mids matter!).

  • Emulates the legendary BOSS Metal Zone (MT-2), the most divisive pedal in history.

View on Mercuriall Audio


Best CE-2 Emulation: Mercuriall Chorus WS-1

Rating: ⭐⭐⭐⭐☆

Why We Love It:

  • Spot-on BOSS CE-2 Chorus emulation for lush, dreamy textures.

  • Stereo processing for extra-wide goodness.

  • Depth, Speed, and Mix controls—because you like options.

View on Mercuriall Audio


Best JFET Emulation: Ignite Amps Pro F.E.T.

Rating: ⭐⭐⭐⭐☆

Why We Love It:

  • Tube-like saturation with JFET-based gain stages—because tubes are expensive.

  • 4-band EQ with Shape toggle for extra tweakability.

  • Mono/Stereo processing and up to 8x oversampling for pristine tone.

View on KVR Audio


Best RAT Emulation: TSE R47

Rating: ⭐⭐⭐⭐☆

Why We Love It:

  • RAT-style overdrive that goes from crunchy blues to searing distortion.

  • Simple interface with Drive, Tone, and Output controls—no rocket science required.

  • Stereo/Dual mode for flexible routing.

View on TSE Audio


Best Amp Distortion: Heptode Deep Crunch

Rating: ⭐⭐⭐⭐☆

Why We Love It:

  • Emulates the Soldano SLO-100 amp distortion—legendary for a reason.

  • 3-band EQ with cab sim switch for extra versatility.

  • Great for everything from classic rock to high-gain mayhem.

View on KVR Audio


Best TS for Heavy Music: Ignite Amps TSB1 Tyrant Screamer

Rating: ⭐⭐⭐⭐☆

Why We Love It:

  • Tube Screamer-inspired, but with an extra shot of aggression.

  • Additional Sweep control for dialing in that perfect midrange.

  • Mono/Stereo processing with oversampling options.

View on KVR Audio


Final Thoughts

All of these plugins offer high-quality emulations of legendary guitar pedals—for the unbeatable price of free! Whether you want creamy overdrive, skull-crushing distortion, or a chorus that would make The Police jealous, these plugins will take your tone to the next level—without breaking the bank.

Tried any of these? Let us know in the comments! Got a favorite we missed? Share your secret weapons!

The Essential Role of TOZO Noise-Canceling Headphones in Home Studios

In recent years, home studios have revolutionized the music and audio production industry, making it possible for individuals to create professional-quality work from the comfort of their homes. As technology evolves, the tools available for these home setups continue to grow in sophistication and accessibility. Among these tools, TOZO noise-canceling headphones have emerged as an essential asset for home studio owners. With their impeccable sound quality, advanced noise-cancellation technology, and affordability, TOZO headphones stand out as a must-have. This blog post will explore why TOZO noise-canceling headphones are critical for home studios and how they enhance productivity and creativity.

Why Noise-Canceling Headphones Matter in a Home Studio

Before diving into TOZO's offerings, let’s examine why noise-canceling headphones are indispensable for a home studio. Unlike professional studio environments, home studios often lack comprehensive acoustic treatment. Ambient noise from traffic, family members, pets, or neighbors can interfere with critical listening tasks such as mixing, mastering, and tracking. Noise-canceling headphones mitigate these distractions, providing a focused listening environment and enabling you to hear every detail of your audio.

Noise-canceling headphones are particularly useful during mixing and mastering sessions, where precision is paramount. Subtle frequencies and intricate soundstage details can make or break a mix. Without proper isolation, these nuances might be missed, resulting in subpar audio quality. High-quality noise-canceling headphones ensure that external noise doesn’t compromise your ability to make informed sonic decisions.

Key Features of TOZO Noise-Canceling Headphones

TOZO headphones have earned a reputation for delivering top-tier performance at an accessible price point. Here are the standout features that make them ideal for home studio use:

1. Advanced Noise-Cancellation Technology

TOZO headphones use hybrid active noise-canceling (ANC) technology, combining feedforward and feedback microphones to cancel out a wide range of external noises. This ensures a quiet and immersive listening experience, even in noisy environments. Whether you’re editing a podcast or mixing a song, the ANC feature allows you to focus solely on your audio.

2. Exceptional Sound Quality

One of the most critical aspects of studio headphones is sound accuracy. TOZO headphones are engineered with high-resolution audio drivers that deliver a balanced frequency response. The bass is tight and controlled, the mids are clear, and the highs are detailed without being harsh. This neutral sound profile ensures you’re hearing your audio as it truly is, enabling accurate mixing and mastering decisions.

3. Comfortable Design for Long Sessions

Home studio sessions often stretch for hours, making comfort a top priority. TOZO headphones feature ergonomic designs with plush ear cushions and adjustable headbands to ensure a snug fit. Their lightweight build reduces fatigue, allowing you to work on your projects for extended periods without discomfort.

4. Wireless and Wired Options

Flexibility is another area where TOZO excels. Their headphones offer both wireless and wired modes, catering to different use cases. The Bluetooth connectivity is reliable, with low latency, making it suitable for casual listening or referencing. For critical listening tasks, the wired mode ensures an uncompressed audio signal, preserving the integrity of your work.

5. Long Battery Life

For those who prefer wireless functionality, TOZO headphones provide impressive battery life. Depending on the model, you can expect up to 30 hours of continuous playback on a single charge. This ensures that you won’t be interrupted during long sessions.

6. Affordability

TOZO headphones offer professional-grade features at a fraction of the cost of high-end studio headphones. This makes them accessible to home studio owners working within tight budgets, without sacrificing quality.

How TOZO Headphones Enhance Home Studio Workflows

TOZO headphones are more than just an accessory; they’re a tool that can significantly improve your home studio workflow. Here’s how:

1. Precision in Mixing and Mastering

The accurate sound reproduction of TOZO headphones ensures that you can identify issues in your mix, such as frequency imbalances or phase problems. This precision allows you to make adjustments that translate well across different playback systems, from car speakers to high-end audio systems.

2. Isolation During Tracking

When recording vocals or instruments, bleed from playback monitors can be a problem. TOZO’s noise-canceling headphones provide isolation, ensuring that the backing track doesn’t interfere with the recording. This results in cleaner takes and less time spent on editing.

3. Focus and Productivity

Distractions can derail your creative process. With TOZO’s noise-cancellation, you can block out the outside world and immerse yourself in your work. This focused environment fosters creativity and productivity, allowing you to achieve more in less time.

4. Versatility Across Applications

TOZO headphones aren’t limited to music production. They’re equally effective for podcast editing, video production, and general listening. Their versatility makes them a valuable addition to any home studio.

TOZO Models Recommended for Home Studios

TOZO offers several models of noise-canceling headphones, each with features tailored to different needs. Here are some models highly recommended for home studio use:

TOZO NC7

The NC7 is a flagship model with state-of-the-art ANC technology and a 40mm dynamic driver for superior sound quality. Its foldable design and extended battery life make it a practical choice for home studio users.

TOZO NC9

The NC9 takes things a step further with an upgraded noise-cancellation chip and transparency mode. This feature allows you to hear ambient sounds when needed, adding convenience during collaborative sessions.

TOZO NC2

For budget-conscious users, the NC2 offers excellent performance at an affordable price. It features hybrid ANC, balanced sound, and a comfortable design, making it a solid choice for home studios.

Tips for Getting the Most Out of Your TOZO Headphones

To maximize the potential of your TOZO noise-canceling headphones, consider the following tips:

  1. Optimize Fit: Ensure the ear cups create a proper seal around your ears to enhance noise cancellation and bass response.

  2. Use Wired Mode for Mixing: When working on critical tasks like mixing and mastering, use the wired mode to eliminate latency and preserve audio fidelity.

  3. Maintain Battery Health: For wireless models, avoid overcharging to prolong battery life.

  4. Pair With Acoustic Treatment: While TOZO headphones are excellent for isolating sound, combining them with basic acoustic treatment in your home studio can further improve your listening environment.

  5. Clean Regularly: Keep your headphones clean to maintain their comfort and longevity. Use a soft cloth to wipe down the ear cups and headband.

Conclusion

TOZO noise-canceling headphones are a game-changer for home studio owners. They combine advanced technology, exceptional sound quality, and user-friendly design at an affordable price point, making professional-grade audio production accessible to everyone. Whether you’re a seasoned producer or just starting your journey, investing in a pair of TOZO headphones can elevate your home studio experience and help you achieve your creative goals.

With their versatility, precision, and affordability, TOZO noise-canceling headphones are not just a tool but an essential companion in the modern home studio. Don’t let external distractions or subpar equipment hold you back—step up your audio game with TOZO, and bring your creative vision to life.


Plug-Ins for For New and Old

When I first started out, I didn't know anything. (I mean like NOTHING) I had to learn it all along the way. Thanks to YouTube and good Ol' Fashioned books, I have come a long way.

Probably one of the most complicated ideas for me to wrap my head around at first was that I could load a "plug-in" up into my music program and it would do stuff. Most of them sounded great on "paper" but the names were misleading or completely philosophical and not applicable to what the plug-in actually did. Worse yet, I'd open the thing and it was so complicated to learn that I literally would have to spend all day just messing with it.

Enter KiloHearts! I sincerely wish this company had been around when I first started out. Not only are the plug-ins exact representations of what they are named, they are so simple that my son (10 years old) could know there usage when asked.
What's even better is because they are stripped down of all the eye candy, they are very easy on your computers RAM and hard drive space. Each knob, every slider, and every adjustment that could be made has a built in guide that tells you exactly what you're adjusting! (Simply hover over any given adjustment area, and it will show you a small pop up info window) So, if you are a beginner I highly recommend you snatch these up.

For those of you who are thinking, "I'll bet they're lacking on the quality side." I am here to tell you, as one who has used boutique plug-ins from a huge variety of big players, these plugs are very competitive and offer just as much versatility and power as others on the market. In fact, the creativity behind the MultiPass plug in alone is enough to draw in even the most advanced audio nerd there is due to its infinite possibilities.

Here is a short video that I made in hopes to display what words can't say. Give it a quick look and see if you're creative juices aren't inspired!


Creating A Song: Step By Step

If there was one thing I really desired when I started to record and mix my own music, it was a clear cut, over the shoulder tutorial. I needed someone with more experience than I had to set me down and say, "Here is how you get started."

Unfortunately, I never had that. Though there are a ton of online tutorials, none of them seemed to cover just the basics, or how to get started in all of this. Since then there have been some who seen the need and stepped up to the plate to offer some help. I simply had to figure it out as I went and make a ton of mistakes.

That's why I decided to start a series of videos where I go through the entire process, step by step. It is that over the shoulder, "Here's how you get started" video series that I was looking for when I started out. Now you can follow along with me as I go through the whole thing! The best part is, I am not doing a ton of editing or working ahead. Why, is that important? Because it will allow you to see my mistakes. Yep, I said that. Then I will show you how I fix some of those mistakes! Priceless!
All to often (especially with social media) we catch only a glimpse of the beautiful editors rendition of something. This at times leaves us thinking that we need to be perfect. Although perfection is a good thing to strive for, and as a perfectionist I am guilty, we can over do it at times. The best concert I ever went to was a Casting Crowns concert. The reason why it was so good was because it was raw and unedited. They messed up a few times, but just kept right on going. The best training I have received on my job was at those moments when everything went wrong and chaos was running a muck. Thence trainer stepped in and showed how to fix it. Now, had that never happened, I would have been lost if the same situation cropped up without a trainer and without the experience. So, when I run into a problem with the mix we are working on, I am not gonna fix it in pre and then present it in post as a perfectly polished peice of work. Instead, I am going to point out the mistake and walk you through how I am going to attempt to fix it. A boss will tell you how to do something, a salesman will show you the finished product while carefully leaving out important flaws in that product. A leader, and a friend, will walk you through the whole process so that your aware of all the ins and outs, and show you how to do something.

That's what I am wanting to achieve in this video series. I want to genuinely help with a real world approach. Will the song be perfect? Nope? Will this series make you better? It may help you grasp some concepts to help you get there, but ultimately doing more recording, mixing, writing, etc., is what will make you better.

So head on over to YouTube and follow along with me as we go through the "Creating A Song: Step By Step" series.


Make sure you subscribe to stay up to date on all the latest videos I will be posting.

Recording with Purpose

http://bit.ly/HSS_YouTube_Channel

By now I hope you have realized the futility of "fixing things in the mix". Not only does it take more time to "fix" things, but in the end everyone loses. The artist you may represent (even if it's yourself), the listener, your mom... (that is if she listens to your work) Everyone will be subjected to the an over processed audio nightmare! Getting a great take, from a great artist, who gave a great performance, without taking a great deal of time to set up mics and position them properly is like playing Russian roulette. You may get a good take by just throwing up a mic where you think it should go, but you may not also. You may be able to even get it sounding decent after an hour of grueling work and 133 plug-ins. However, what if when you got that amazing take, and incorporated it into the mix later, you thought "Hey that actually sounds pretty good the way it is!"

What if, after saying that, instead of struggling to find the right plug-in to make it sound good, you were struggling to find a plug-in at all to even put on it in the first place. Now, I know that in today's world of gear crazy, plug-in happy, home studios, this seems like some Utopia that is not attainable without the latest Wave's deal or that "Stupid Deal of the Day". Yet, in all actuality it is possible!

All it takes is some time to record with purpose. First you have to decide for yourself what is the purpose of the instrument/s you're recording? Are they supportive, or are they the leading elements that make up the song? Do they need a certain sound or tone to set well? Think about it as if you were recording it into your DAW without any hope of ever changing it again. Does the electric guitar need to be brighter to even out the low-mids that are panned hard left from an acoustic part? Maybe it needs to be darker to even out the hype from the keys? 

The best way to know for certain is to hear it as it is being recorded in real time. Break out the ol' headphones and crank up the monitoring level so you can clearly hear what that mic is doing to the sound. Small movements from a mic can dramatically effect the tone of something so move it around quickly until you get in the ballpark of what your looking for and then slow way down, moving it only by inches one way or another. Once you got that sweet spot, remember where you had and mark it in some way if you can. (Tape, sharpie, chalk, etc. use your better judgment as to which would work best) That way you can get back to that tone again if you should need to redo a riff or overdub.

Ultimately, you want to be thinking about the end result. What would you want it to sound like when it's all said and done? By taking this little bit of extra time up front and getting just the right sound going in, you will save a ton of time, CPU, and hair when it comes to mixing. 

I am starting a series on the YouTube channel where I am going to be covering this and other things related as I work through a song step by step from idea to finished product, follow along with me and make something of your own as well! When its all said and done, I'd love to hear what you got! Until next time, go make some music!

You can subscribe to the channel here: http://bit.ly/HSS_YouTube_Channel

BOSS BR-800 Control Surface Set-Up

Setting up the Br-800 to work as a Control Surface is actually quite easy. So, why would anyone want to do such a thing? Well, as I near the end of a mix one of my favorite final embellishments that breaths life as well as energy into a mix is Automation. For those of who you related with that, you probably also know then that using a mouse to perform this task is daunting to say the least. It is less musical, it is less creative, it is less... well cool.

In fact, it has helped my mixes in the present to set up my Br-800 in Control Surface mode and just close my eyes with the faders resting under my fingers. We mix with our ears, not our eyes, and so this takes away that urge to "see" the mix get better. Not to mention, when the wife walks in you look really into it and seem (to the untrained eye) to be working really hard. Unfortunately, my wife knows that I am having fun rather than me fooling her into believing that I am "in the throws" of a complex situation. She usually just chuckles and walks away.

Now, if you are not doing Automation, you need to. If you are waiting on buying a Control Surface first, don't. I used a mouse for years and it works just fine, its just more work. Also as stated previous;y, it's just not as cool. Anywho, I was asked to create a video showing how to set the Br-800 up for this wonderful feature and so without further adieu.


Using Aux Tracks

Many more possibilities open up when you explore the world of buses, aux tracks and sends — and
we'll do that right now, starting with a classic mix technique.

Here's a little scenario. You've got 20 audio tracks, and they all need reverb in differing amounts. Surely it's just a question of instantiating a reverb plug‑in on each? Well, it's not out of the question, but it'd be a terribly cumbersome way of working. First of all, the CPU hit of 20 reverbs could be colossal — potentially crippling if your computer is already maxed out. Second, configuring all those reverbs is very labour intensive, with way too much room for confusion. What's needed is a way to share one reverb flexibly amongst those 20 tracks — and it's easy. We're going to set it up on an aux track, a track type that you can't record on (although it can still be automated) and whose purpose in life is as a routing tool. Next, we'll configure the specialised extra outputs on the audio tracks — their aux sends — to split off some signal from each, destined for the reverb. Then you can tie the whole lot together with a bus. 


A technique that comes up frequently in SOS's interviews with great producers and engineers is parallel compression. Often used to supercharge drum overheads, in essence it's all about splitting the track's signal in two, applying aggressive compression to one 'half', leaving the other alone, and blending to taste. Parallel compression can create seriously dynamic‑sounding drum tracks. Most compressors won't have a wet/dry mix control, but if yours does, set it to 100 percent wet. Signal now begins to flow through the aux track, and its compressor, in parallel with the dry track — hence the name of the technique. One extra thing to think about here is whether the aux send is operating post‑fader or pre‑fader. What's the difference? Well, if it's post‑fader (which it'll be by default), as you adjust the drum track's main level fader, the send level changes too. If it's pre‑fader (which it will become if you click the send's little button), the send level is completely independent from the track's level fader. For parallel compression, I like to work pre‑fader, as then I can adjust the relative levels of the dry and compressed drums on their main faders with no fear of unpredictable level interactions as the mix takes shape. 

Recently, the Sonar family released the Jamaican Plain update which allowed the use of Aux tracks and Patch Points within the main track window. This has been a major upgrade to my effeiciency. Below is a video where I use some of those features similar to the areas SOS covered up top.


Song Arrangement

Song arrangement, in its purest form is making things exciting, engaging, and emotional. Music in
itself demands, at times, an emotional response. While there are several tools we can utilize to add this much needed element to our art, arrangement is the most effective ingredient of a song to keep it
interesting.

Our mix can only go so far with our mixing skills and mixing ninja tricks. Though plug ins, mic
placement, effects ITB and outboard, etc. can provide a great foundation for emotional real estate,
arrangement is the icing on the cake. A great song can be hindered or helped by this one element.

There are at least 8 identifiable arrangement strategies that are used in music. I will explain briefly what each strategy consists of and try to give some examples of how they're
used. They are as follows:

• Minimal
• Reproducible
• Maximal
• Steady-state
• Cumulative/Subtractive
• Stepped
• Dynamic Contrast
• Unplugged/Plugged


Minimal

A minimal arrangement is one in which there are very few instruments and/or they are played in a
minimal style without to much complexity. This arrangement strategy makes good use of silence and
uses the vocals to feed emotion.

Reproducible

This arrangement strategy is one that is recorded with a live sound in a studio or is actually recorded
live. It is one that can be reproduced in a live setting without losing its studio versions fingerprint.

Maximal

This is the proverbial “Wall of Sound”. Anything goes in creating this wall as well. All instruments in, 40 vocal parts, you get the point.

Steady-State

This is where the song is pretty toned down. It may have a loop that plays through the whole song, a
sound effect or something, but it generally stays in the box. This style focuses on the lyrics more.

Cumulative/Subtractive

This arrangement style allows the song to grow and expand as it progresses, and at times may take
away elements to create interest and emotion. It usually ends in a climactic moment.

Stepped

A stepped arrangement is one is which the song uses two or three identifiable sections that are
contrasted by their dynamic level and instrumentation. The song alternates between these, stepping up to one and down to another at times. It also has varying keys and tempos at times.

Dynamic Contrast

The intention of this arrangement strategy is to create ear shock, usually by a sudden loud snare hit or
instrument. This can be achieved as well by volume changes and intensity.

Unplugged/Plugged

Some times a song that is done acoustically will be redone in an electrical fashion and vice versa. There used to be a trend for awhile that almost every artist had to do an unplugged version of some of their songs. It can fill another slot on that album and let new listeners hear something old, as well as old listeners hear something different. This can be really cool if you're predominantly a rocker, and then you put an acoustic song on your album. Keep them guessing and they'll stay interested.

Check out the video below for an example of nearly all of these elements in one song.


Mix Tips-Improving Workflow

In the video below I share with you some ways you can speed up your workflow and make your sessions more efficient. Some tips shared are Sonar specific, however, the concepts can be applied across any platform.


Mixing for Stereo Width

Mixing involves so much more than just moving faders around. It encompasses a whole skill set that has to be fine tuned and honed over years of practice. One prevailing question that I get is , "How do I get my mix to sound wide and full?" Well, as stated above, there are a lot of factors that go into creating stereo image. I am going to cover some of the basics first, and then we will dive a little deeper.

Wide vs. Full

When someone asks me that question I have to correct them in their presumption that both attributes (Wide and full) are one in the same. Although both contribute to one another, when someone asks this question they need to know that they are speaking of two different textures in a mix. For instance, a guitar can sound full and not sound wide, and vice versa.
Just like most everything else in mixing, a "full" sound can be subjective to the listener. However, anyone can spot a wide sound in the right listening environment. To me a "full" sound is a natural sound. It is more a feeling that comes from the instrument that places you in the same room with it, as if it were right in front of you. Whereas, a wide sound, places the instrument all around you and envelops you. So, now that I have set that straight, we can move on to ways we can achieve stereo width.

True Stereo vs. Stereo Shams


When I first started mixing, I thought that simply cloning a track and panning them hard right and left, would give me stereo sound. I soon found that there is no stereo width achieved by doing that. Essentially, all you are doing is creating a louder Mono track that now takes up more real estate on both ears, and your ears cannot decipher the difference between a single Mono track and a double of the same.

The best way to get true stereo sound is to record the same part twice, on two separate tracks, and then pan them out. The small inconsistencies in your playing will add up to  huge sound that your ears can decipher now as two different parts. You can use the same source, and the same settings if you'd like, although it may add more depth to add or remove elements from the second track.

Another way to get decent stereo results is by utilizing different mics and mic placements. There are a ton of ways to set up two microphones to record in stereo. One of my favorites right now is "Mid-Side Recording". In the video below I will cover that in further detail.

Then there are the shams... These are stereo widening plug-ins, delay plug-ins, and others that emulate width. Although you can get some usable results from these in certain situations, if you want real width you can feel, then you need to take a little extra time to layer another track or record in stereo. In the video below I will give you an example of both true stereo and stereo emulation. Don't forget to subscribe to the channel while you 're there.


Clarity In The Mix

Everyone wants clarity in their mix. However, what is your definition of clarity? Could it be that your definition has already set you up for searching an endless road of tips and tricks? Could it be that your perception of clarity has clouded what is truly important?

Let Me Define This

Clarity: clearness, coherent, intelligible, transparent; "The clarity of the water lets me know that it is clean."

So, from this definition we can ascertain that what we are looking for when we seek clarity in a mix, an intelligible and coherent mix. Now, here is where it gets deeper. If all musicians and mixing engineers have their own subjective view of what "clarity" is then how do we know for sure if we have obtained it!?

The Subjective Truth

In my opinion, truth is not subjective. A thing is either true or it is not. It is true that every ear is subjective, and every audio engineer is shaping what they know as a good mix based off of the music they love. So the clarity you seek in your mix may be more bass guitar shinning through. For a guitarist it may be more lead. A drummer might say "more cowbell please". Though truth is not subjective, clarity most certainly is.

Let Me Clarify What Clarity Is Not

Some would say, "Clarity is being able to hear every instrument clearly." While this is true to a certain extent, it is still subjective. Clarity to me is a "mud-less" mix. In fact, everyone can agree when a mix is muddy and when it is defined and unmasked by opposing frequencies all over the place.

If it were simply about instruments being heard then this presents a problem. Not every instrument in the mix has to be heard at all times. Through the use of automation feeling and vibe is created. Instruments drop out and build to a crescendo at times. Therefore, this typical definition just doesn't fit with the word clarity if hearing every instrument is the only basis. The fact that every instrument is heard and sounds defined is due to separation. Separation is derived from equalization and panning, and is further influenced by a respective sound sources frequency ranges.

Conclusion

When you seek clarity, you are really looking for a taste, a style, and your fingerprint in a mix. To obtain that you need to do several small things right. Volume levels, panning, equalization, and arrangement all play their part in creating the clarity that you are looking for. Make the best use of them and enjoy some good clean fun.


A Better Mix: Simple Steps (Part 2)

In the previous post I included a video about the process and the concepts I used to dramatically improve my mix on the song "Livin' For The Moment". In the video attached to this post I go step by step explaining the concepts. I hope you enjoy this sort of over the shoulder approach. To hear the podcast associated with this post click here. http://bit.ly/HSS_Podcast

A Better Mix: Simple Steps

After my latest album release I made some resolutions. There have been some things that I have always done just to "get by" and make some music. Well, I realize that I was wrong about a lot of those methods. (Yep, I just said I was wrong)

So I decided if I was going to step it up and get more serious about making better music/better mixes that I had to break away from the norm. This means I would have to work harder, but I have to say, it was worth it! This latest song nearly mixed itself and the truth is, I had more fun with it! Though these things are commonly known, I am reiterating there importance to making better mixes. For the most part I have utilized these in most of mixes, but going forward, I will be takin the time to implement these methods on EVERY mix, EVERY time!

So, check out this video, and let me know if you have any other tips for the community. God Bless!


Free Music Download

Want to know how to get my album for FREE?! Just watch this 3 minute video and find out! Also the first person to comment below on how many takes it took to get this video in will receive a little gift from yours truly. Thanks!


New Mixing Headphones

If you have been following me on my Home Studio journey, you know that I am an advocate of Mixing on headphones. Though many say it is impossible, if done with the right goals in mind it can be very rewarding and enjoyable. Recently, I bought me a set of semi-open backed headphones for just such a task. I wanted to let you know what I thought of them so that if you were thinking of buying a pair you could get an unbiased opinion.

The headphones in question are the AKG K 240 Semi-Open Studio Headphones. Now, upon first glance I thought "these things look cheap". However, their appearance and build are another thing all together. Though they do have a "cheapesh" look to them (yeah I made that word up), their build is pretty solid. They are very light weight and above all else... They sound amazing! No, not amazing like an average listener would find amazing. (Smiley face EQ curve, overly bassy, sparkly) On the contrary these are very reference like. I mixed a song on them in 30 minutes and it translated well! I went back and checked the same mix on my M-Audio BX5a's and there were only a few adjustments that needed to be made! This was a win for me! I picked these up at a great price and you can to, click the picture or the link above and get a great deal while also helping out a fellow engineer at no extra cost to you. Have an awesome day!

Mobile Mix Reference

If you are anything like me, (I will pray for you if you are) then you probably take your mixes with you due to time constraints. You wanna hear it in the car, you wanna check it on that Bluetooth stereo your buddy has, and so you put the printed mix (your latest revision) on your mobile device and take it with you.

I use my iPhone a lot! I even utilize the features that it has installed to help me make educated decisions when I get back to the studio. Let me explain that last statement in detail. There are features in the iPhone that aren't so well known that can help you out as a mixing engineer.

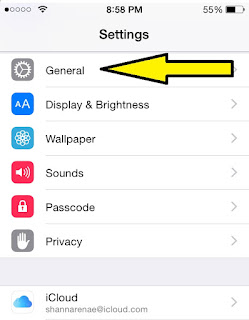
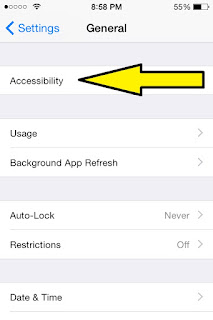
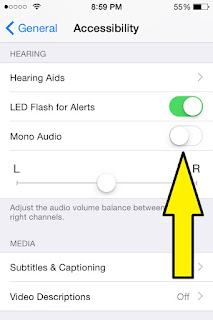
The first is the mono setting for your music. If you were unable to check for phase or proper EQ adjustments before you left, or maybe even forgot, this setting can really help out. However, it is kind of hidden in all the various menus, menus that most will never even go through. To utilize this setting as a mixing reference tool follow the instructions below

1) Click on the Settings button


2) Next click on the General option


3) Now click on the Accessibility menu
4) Scroll to the bottom now and you will see the Mono option


I recently just used this on a mix that I was in a hurry to get on the phone. I had not checked the phase, or even to mix itself in mono as of yet and was still in the "rough draft". I could hear the guitars in the headphones, but in the car they were gone. So I switched my phone to Mono and the guitars disappeared in the headphones! Immediately I knew the Phase was out on the guitars. Pretty cool that I was able to make that finding while at work and away from the mixing desk.

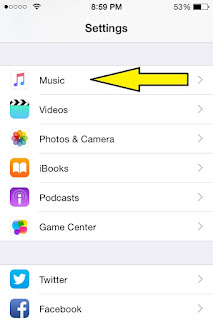
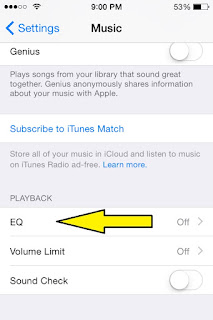
The next menu is a little more accessible and isn't as buried in a maze of other menus. I was surprised however by the number of people that did not know this menu existed. I am speaking of the EQ menu found under the Music app. To find that menu follow the instructions below.

 
1) Click on the Settings button


2) Scroll down to the Music menu
3) Scroll down to the bottom to find the EQ menu

4) Choose from a wide variety of EQ options

Ok, so now that we have found the EQ menu, we can use this to gain insight as to where our mix may be lacking or overdone. For instance, if you can only handle the Bass in your mix on the Bass Reducer setting, chances are you need to make some adjustments to your low end. Now, all this is subjective to the headphones you may be listening on as well.

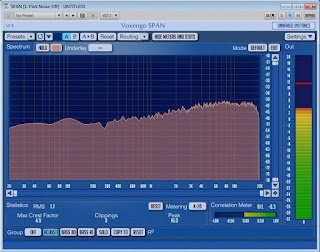
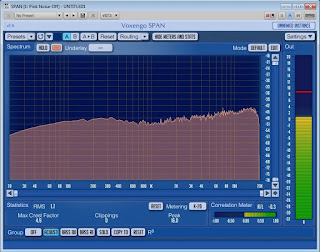
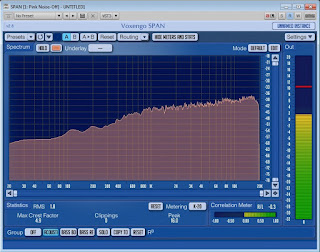
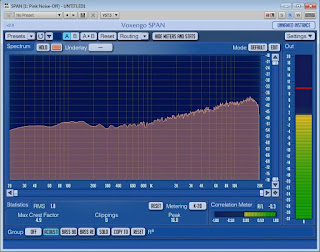
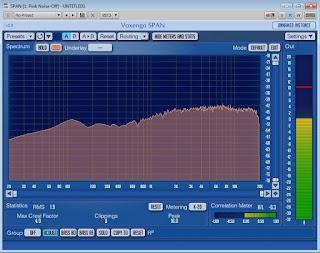
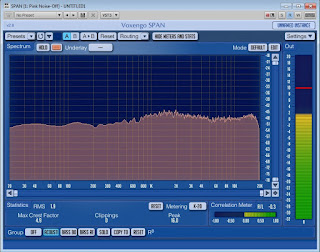
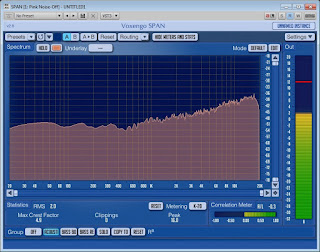
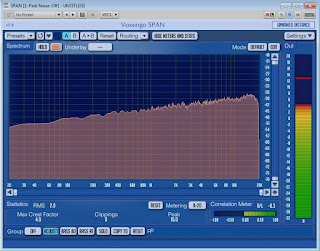
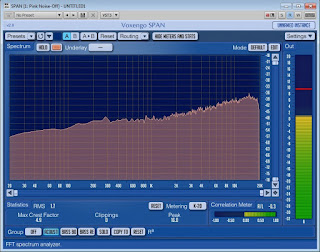
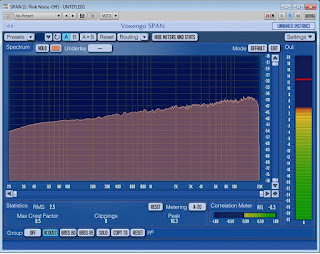
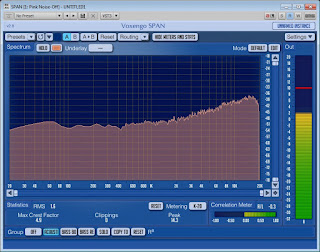
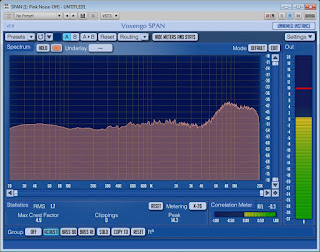
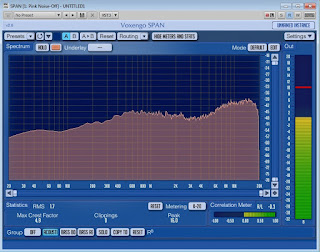
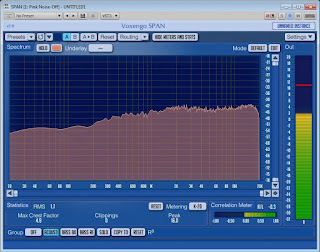
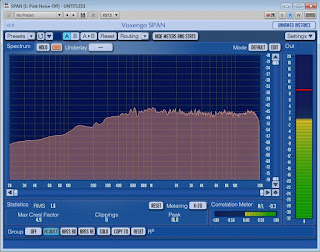
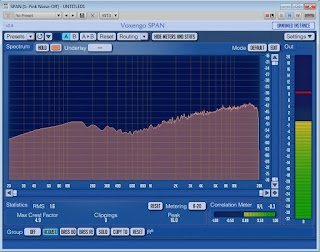
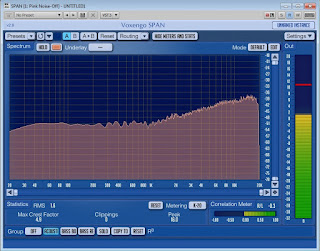
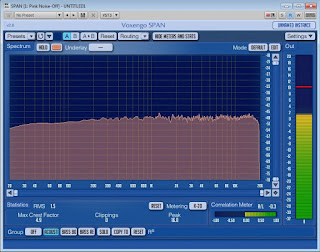
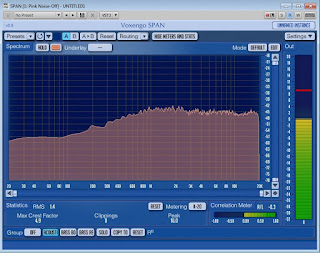
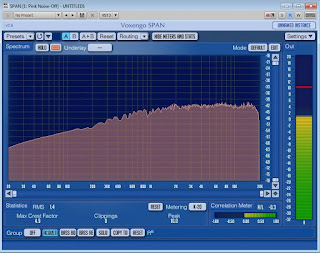
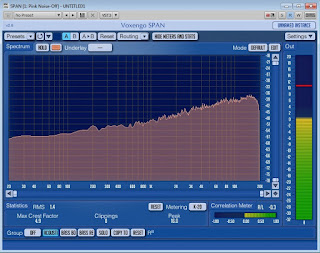
I did a lot of research and even went as far as to get on the Apple website to find what exactly the EQ settings change in the frequency ranges. After a tiring search I turned up nothing. So, in the spirit of my Scottish heritage, I improvised. I downloaded a pink noise signal which is one of the flattest sound profiles you can get. I played it through my iPhone while the headphone jack was plugged into the microphone jack on my PC. Then I put the SPAN plug in on a track and therefore was able to view the EQ changes that were taking place by changing the settings in the iPhone. Below you will find screenshots of the various settings with labels to attribute. This information is no where else! 

Acoustic Setting
Bass Booster Setting


Bass Reducer Setting
Classical Setting
Dance Setting
Deep Setting
Electronic Setting
Flat Setting
Hip-Hop Setting
Jazz Setting
Late Night Setting
Latin Setting
Loudness Setting
Lounge Setting
Piano Setting
Pop Setting
R & B Setting
Rock Setting
Small Speakers Setting
Spoken Word Setting
Treble Booster Setting
Treble Reducer Setting
Vocal Booster Setting
Now, one thing to remember is that your car already has an EQ in place, so you need to set your EQ on your iPhone to off before listening in the car, otherwise it will sound all jacked up. I hope this was helpful, if nothing else it is at least interesting. If you would like a copy of the jpegs associated with the EQ settings (the same ones found above) you can download it here.


Review of the Boss-BR 800

My Boss Br-800 has been the single best investment to my Home Studio. I have used it extensively for over 4 years now. It has been my go to Audio Interface, an easy to use Controls Surface, and an excellent Effects Processor. So I thought I'd share my thoughts with you about this little gem!


The BR-800 is a compact and lightweight digital audio recorder designed for ultimate versatility and convenience. The BR-800 provides 4 tracks of simultaneous recording, and 8 tracks of simultaneous playback. It has an additional stereo track that's dedicated to the onboard drum machine, which also includes an editor. The built-in stereo condenser mics lets you record anytime, anywhere without the need for extra equipment. Your files are captured to widely-available SD/SDHC memory cards, supporting capacities up to 32GB. A 1GB card is included to get you started.

The BR-800 has an easy-to-use interface that's based on touch sensors, giving you precision control over all features. An onboard effects processor gives you a wealth of guitar, bass, and vocal effects, while a "Song Sketch" feature provides quick stereo WAV recording. A USB connector allows you to use the BR-800 as a USB audio interface with your Mac or PC, as well as use it as a control surface for DAW applications. Cakewalk SONAR 8.5 LE (Cakewalk Sonar Music Production Software) software is even included for computer-based audio manipulation. For terrific versatility, the BR-800 can operate on a set of 6 AA batteries, USB bus power, or the included AC adapter.


After doing some research I have posted the cheapest price I have found for a new unit. I paid $449 over 4 years ago and this thing has steadily remained within that price range. So when I found it for only $365, I was tempted to buy another one!


Pros:

  • Compact and portable design, ideal for musicians, journalists, and more
  • 4 tracks of simultaneous recording, and 8 tracks of simultaneous playback
  • Dedicated stereo track for the onboard drum machine, which also includes an editor function
  • Built-in stereo condenser mic lets you record anytime, anywhere without the need for extra equipment
  • Records to widely-available SD/SDHC memory cards, supporting capacities up to 32GB. A 1GB card is included to get you started
  • Easy-to-use interface is based on touch sensors, giving you precision control over all features
  • Onboard effects processor gives you a wealth of guitar, bass, and vocal effects
  • "Song Sketch" feature provides quick stereo WAV recording
  • USB connector allows you to use the BR-800 as a USB audio interface with your Mac or PC, as well as use it as a control surface for DAW applications
  • Cakewalk SONAR 8.5 LE software is included for computer-based audio manipulation
  • Operates on a set of 6 AA batteries, USB bus power, or the included AC adapter for terrific versatility
  • 4 XLR inputs on the back of the unit, 4 trs 1/8 inputs on the back as well, and 1 high z on the front
  • Headphone input on the front of the unit for zero latency monitoring or night time jam sessions
  • Line in for recording from various sources 

Cons:

  • The Guitar to Bass simulator can have some hiccups and is not able to pick up polyphonic Bass chords without low end garble
  • Most of the effects that include distortion are "overdone" in my opinion, but can be toned down and shaped into something more feasible 
  • The touch screen panel can be hard to get used to and if it gets oily fingerprints they will have to be cleaned before it will work properly again
  • 24 bit recording is only available on while plugged in via USB
  • Of the 4 XLR preamps on the back of the unit, only one of them has phantom power
  • When using the Loop Record feature, there is a delay in the changing of tracks that can cause a little drop out of audio (1 sec. tops, see video)

Specs:

Simultaneous Rec Tracks 4
Simultaneous Play Tracks 8
Sample Rate 44.1kHz
Bit Rate 24-bit
Effects Yes
Compression Track Compression, Multiband Mastering Compression
Phantom Power Yes (1 channel)
Number of Mic Preamps 4
Audio Interface Yes
Computer Connectivity USB
Built-in Mics 2
Analog Inputs 5 x 1/4", 4 x XLR, 1 x 1/8", 1 x 1/4" (Footswitch)
Analog Outputs 1 x stereo RCA, 1 x 1/4" (Headphones)
USB 1 x Type B
Storage SD (up to 32GB)
Faders 8
Fader Throw Compact (short-throw)
Power DC 9V Adapter (Sold Separately), 2 x AA Batteries, USB Bus
Height 2.31"
Depth 7.25"
Width 11.44"
Weight 2 lbs